

How To Install Replacement Windows In Brick
I accept replaced hundreds of windows in brick-veneer homes across Long Island. The coastal environment requires a little extra care, but the procedure is essentially the same for whatsoever climate. The catchy part with brick is getting the flashing in the right place.
With about window replacement jobs, the ideal installation requires the removal of the siding, which allows the window to exist integrated with the existing weather-resistive barrier (WRB). In a brick-veneer structure, even so, that'southward not and so easy. Removing aged brick and mortar to access the window is certain to exist noticed long after the job is done. The additional cost associated with surgical removal and the painstaking process of matching new brick and mortar is often prohibitive to near clients. And so I resort to the methods described here. The procedures are a compromise, simply they're a lot amend than leaving an old drafty, leaky window
Measurement Is Key
The selection of the proper window is the primary consideration in this surround. I prefer to use a "prime" window. One I utilize a lot is the Andersen replacement window; it can be custom sized to fit the openings perfectly, which makes all the difference. Merely any high-quality window with a nailing flange system will work if you tin get the correct size for the existing openings.
Pay attending to measuring for the new window. When the window opening is in place, the flange will be secured to the framed wall and will exist recessed into the brick opening. To ensure a watertight installation, you demand plenty room to integrate the flashing with the existing WRB.
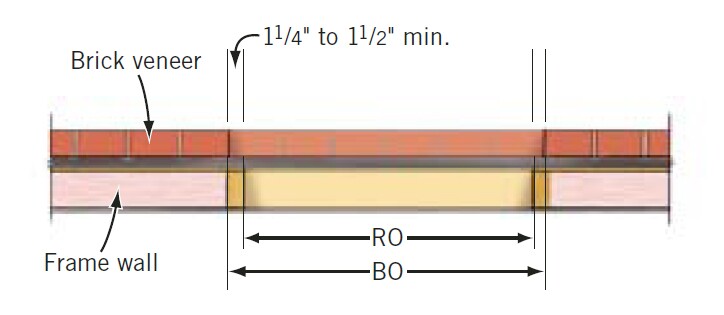
There are 2 measurements of concern here: the rough opening (RO) and the brick opening (BO). The RO is the interior dimension of the framed wall opening. This is the opening we are most familiar with when installing windows in a framed wall. The BO, on the outside, must be big plenty to requite us room to maneuver with our flashing effectually the new window. This space will get covered with an outside brick mold once the new window is in place.
If we're lucky plenty that the existing window has a wood-frame window with a brick-mold exterior trim, the existing RO can normally be used to order the new window. The old brick mold provides the room we need to integrate the flashing. Simply nigh of the applications I meet involve onetime metallic-frame windows (usually steel or aluminum) that were mounted to the RO prior to the application of the brick veneer. The edges of the window typically come up right to the edge of the BO, and the flanges are buried backside the brick. Steel-frame double-hungs, which have a spring mechanism cached in the jambs, have an even larger RO. In whatsoever of these cases, nosotros tin can't use the existing RO to order new windows.
Instead, I starting time mensurate the BO from the outside, so open the window and reference the available RO to the BO. The window should fit in the BO with enough room to allow at least ane i/four to 1 1/2 inches on both sides of the window and a minimum of 3/4 inch on the acme. It may be necessary to pack out the old RO to create an opening that is this much smaller than the BO. Ideally, I like to have two inches on the bottom, too, but I rarely get that and will settle for less if necessary.
Integrating New Flashing and the Existing WRB
Nigh every job I have done has had No. xxx felt or building paper over the framed walls as a WRB. When removing the old window, intendance must be taken to preserve the integrity of this existing WRB. Afterward a number of years it tin become dry and brittle, so we accept to be gentle to continue from tearing it upwards when working the opening.
In one case the former window is out, we focus our attention on preparing the opening, using a metallic sill pan and flexible flashing, as outlined. It'due south of import to use a sill pan that gives y'all an upturned edge on the inside to cake water draining to the interior, and to lap the flashing over the pan so water draining from higher up will be caught by the sill pan.


Pace 3: Cover the side jambs of the RO with 2 strips of flashing tape. To do this, the author kickoff slits the newspaper on the back-side cut about 2 inches from one border, and so peels off the capitalist on the wide side, using the exposed tape to cover the RO jambs. This leaves the 2-inch department to stand straight out of the opening. The author then peels off the remaining backer paper and uses a taping knife to push button the tape back behind the brick, where it tin can attach to the WRB


In some cases, however, in that location is not enough of a space behind the brick to push button the flashing record back there. Or, the mortar that squeezed out on the back side of the brick has clogged the space. This squeeze out may be chipped away at the edges, just if it'south really heavy, even that won't exist plenty to provide clearance for flexible tape. In this example, I bend iv aluminum or copper 50-shaped strips, as shown. At a minimum, the legs of these 50-strips should exist 2 inches, simply a 3- to 4-inch leg is preferable. Call back: The farther the h2o is deflected by the flashing from the border of the BO, where the almost water is probable to get blown in, the less likely the water will find its way dorsum into the RO every bit it drains downwardly the wall.
Installing the Window
Once the sides and the sill accept been wrapped, it'south time to install the window. If the BO is tight, nosotros may demand to trim back the window flanges. I often have to completely remove the bottom flange to get the window in, every bit well. A jigsaw works for trimming off a formed vinyl flange. On some windows, it's possible to pull the flange extrusion out of the frame, or it may require careful trimming with snips and a utility knife.
When installing the window, kickoff apply caulking to the top and two side flanges. Without a bottom flange, we don't need caulk there. But even when we have an intact nailing flange, nosotros never caulk the bottom of a window. If water leaks through the windows, information technology must be able to bleed out.
Shim and foursquare the window, and cheque it for proper operation. In coastal zones, impact-resistant units usually must be installed with framing clips, as shown. This really simplifies the installation, since the nailing flanges may be hard to get to, specially at the top. If the window manufacturer does not offer special metal clips for this purpose, I use a 20-gauge metal necktie plate, such as a Simpson Stiff-Tie TP15 or TP35, screwed to the window first and and then folded over at the inside edge of the stud. If you're unsure what the local codes require in high-current of air zones, it's prudent to check with the lawmaking inspector start to make sure this will piece of work.

After the window is in place, I cream the gap between the window and the RO with a low-expanding cream to create an effective air seal (see "Building Science Nuts").
Last Flash
With the window installed, I go back outside and apply flashing record over the flange. This can be difficult if the BO is tight. If possible, I push the record behind the brick. Nevertheless, if at that place is not plenty room to get this last flashing backside the brick, I'll go out it long, allowing it to flap aslope the brick (Figure 6). Then, after I install the brick mold (or other trim to fill out the masonry opening), I will trim this backlog away and caulk the trim to the masonry at the sides and bottom of the BO. Across the head, though, I leave gaps in the caulk to allow any water that might become by the brick above to escape. Nigh brick veneer should also take cry holes in a higher place the lintel for exactly this purpose.

Photos by the author and his crew. Illustrations by Chuck Lockhart.

How To Install Replacement Windows In Brick,
Source: https://www.jlconline.com/how-to/exteriors/replacing-windows-in-brick-veneer-homes_o
Posted by: kleinsenjoyergoo.blogspot.com
0 Response to "How To Install Replacement Windows In Brick"
Post a Comment