

How To Manage Quick Access In Windows 10
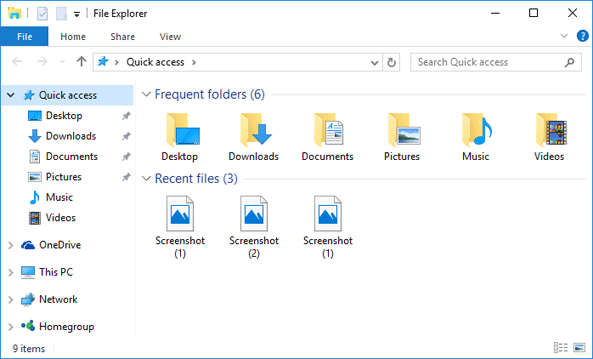
Windows 10 brought many new features upon its release, i of which is the Quick access section in your File Explorer . It replaced the classic "Favorites" pane. You can gain immediate access to your Desktop, Downloads folder, Documents, and shows upwardly to four recently used folders
However, some people find the Quick access more damage than practiced, which leads to the question: how tin can y'all remove the Quick access department in the Windows 10 File Explorer? Nosotros're here to answer.
What is Quick access?
The Quick admission section is institute when you open the File Explorer. It's the equivalent of Favorites , constitute in older versions of Windows. It gives you lot access to your frequently used folders and allows you to open up contempo files equally well.
While Quick access was intended to assist with your navigation and workflow, some Windows users wait at it as an unwelcome change. If you're besides feeling that way, feel complimentary to follow our methods below to either hibernate or entirely remove it from your File Explorer.
We highly advise setting up a System Restore Point to ensure no damage is done to your figurer while removing Quick access. If y'all don't know how to do that, we recommend watching Techddictive's " Windows 10 - How to Create a System Restore Signal " video.
Method 1: Disable Quick access page in the File Explorer
While this method doesn't completely remove Quick access , it allows you lot to open up the File Explorer without having to meet the Quick admission page upon launch. Simple as that — all you need is the File Explorer
- Open the File Explorer past either clicking on its icon in your taskbar or using the Windows + E keyboard shortcut.
- Click on the View bill of fare from the top of the File Explorer window.

- Click on the small arrow under the Options button to aggrandize the menu.
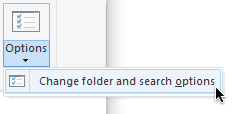
- Click on " Change folder and search options ."
- Brand sure you stay in the General tab. The first affair yous need to practise is alter the " Open File Explorer to " setting to " This PC ." Now, you won't see the Quick access bill of fare when opening the File Explorer.

- Click the OK push button. After making this modify, you should see the "This PC" tab whenever you lot open a File Explorer window.
Method ii: Turn off Quick access page using the Registry
The Registry allows you lot to make advanced changes to your system which may not be available via regular options. We'll be using this to turn off the Quick access page, withal, it'll all the same exist nowadays on your navigation pane.
Warning : Nosotros recommend you back your Registry upwardly or create a System Restore Betoken earlier performing any Registry modifications. I bad change can crusade a plethora of issues on your device — it's always the safest to back things upwardly.
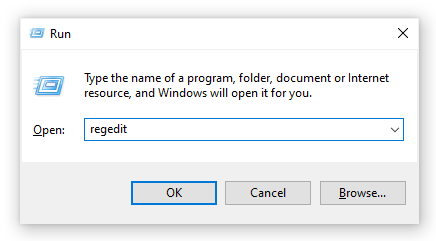
- Press the Ctrl + R keys on your keyboard to bring up the Run utility. Next, type in " Regedit " and click on the OK push button. This is going to launch the Registry Editor, which is part of Windows ten itself.
- You tin can navigate the Registry Editor from the left pane. Using the pointer buttons adjacent to folder names, you can expand them. Using this, navigate to the following registry key: HKEY_CURRENT_USER\SOFTWARE\Microsoft\Windows\CurrentVersion\Explorer\Avant-garde

- When you achieve the Advanced folder, yous should see a list of entries on the left side of the window. Locate the " LaunchTo " entry in this list, then double click on information technology to open its properties.

- Change the data value to 0 . Make certain not to make any other changes!

- Click the OK push button and shut the Registry Editor.
- Restart your computer to finalize the changes.
Method iii: Remove Quick admission from the navigation pane
As of right now, this method is the only fashion to completely remove the Quick admission from your navigation pane. What you demand to exercise is utilise the Registry once again.
Warning : We recommend you dorsum your Registry upwardly or create a System Restore Point before performing any Registry modifications. One bad change can cause a plethora of issues on your device — it'southward ever the safest to back things upward.
- Press the Ctrl + R keys on your keyboard to bring up the Run utility. Next, type in " Regedit " and click on the OK button. This is going to launch the Registry Editor, which is part of Windows 10 itself.
- Navigate to the post-obit key: HKEY_LOCAL_MACHINE\SOFTWARE\Microsoft\Windows\CurrentVersion\Explorer
- Right-click on an empty space in the right pane, then choose New → DWORD (32-scrap) Value .
- Name the new value " HubMode ."
- Double click on the new " HubMode " value to open its backdrop.

- Change the information value to 1 . Make certain not to make any other changes!

- Click the OK button and close the Registry Editor.
- Restart your computer to finalize the changes.
Method 4: Remove pinned folders from Quick access
You lot're able to make the Quick access feature less noticeable by only removing the pinned folders information technology contains. Y'all can utilize this method in conjunction with previous methods for the easy and reversible removal of Quick admission.
- Open up the File Explorer by either clicking on its icon in your taskbar or using the Windows + E keyboard shortcut.
- Click on the arrow symbol side by side to Quick access to aggrandize the section.

- Locate the binder you want to unpin. You tin unpin any folder, fifty-fifty the default ones such as " Desktop " or " Downloads ."
- Correct-click on the folder you want to unpin, then choose the " Unpin from Quick access " choice.
- Repeat this for any folders you lot want to remove from the Quick access section.
Method five: Stop Windows x from showing frequently used folders
If your only upshot with the Quick access section is the fact that information technology shows many of your recently used files and folders, you can easily fix it. All you have to do is simply turn off this feature from the File Explorer.
- Open up the File Explorer by either clicking on its icon in your taskbar or using the Windows + East keyboard shortcut.
- Click on the View bill of fare from the summit of the File Explorer window.

- Click on the small-scale arrow under the Options button to expand the bill of fare.
- Click on " Change folder and search options ."
- Make sure y'all stay in the default General tab. Expect under the Privacy section, and remove the checkmarks from both " Show recently used files in Quick access " and " Evidence often used folders in Quick access ."

- Click the OK button. Yous shouldn't see any of your recently used files or folders showing upward in Quick admission anymore.
Nosotros hope this article was able to assist you remove or personalize the Quick admission characteristic from Windows 10. Keep in mind that nigh of these methods can easily be reversed — only follow our steps again and plow them back on whenever you desire to use the Quick access feature.
Are you interested in learning more nigh Windows ten? You tin scan our dedicated Help Heart department for related articles.
If you're looking for a software visitor you can trust for its integrity and honest concern practices, look no farther than SoftwareKeep. Nosotros are a Microsoft Certified Partner and a BBB Accredited Business that cares about bringing our customers a reliable, satisfying feel on the software products they need. We will be with yous before, during, and later all the sales.
That'southward our 360 Degree SoftwareKeep Guarantee. So, what are you waiting for? Call united states of america Today on +1 877 315 1713 or email sales@softwarekeep.com. As well, you can reach us via Live Chat.
Source: https://softwarekeep.com/help-center/how-to-remove-quick-access-in-windows-10
Posted by: kleinsenjoyergoo.blogspot.com
0 Response to "How To Manage Quick Access In Windows 10"
Post a Comment